Recording your Lecture in Zoom
Preparation
- Ensure you have the Zoom Desktop Client.
- Refer to Guidance on Protecting Privacy and Data During Remote Working and Teaching Using Zoom while COVID-19 Modifications are in Effect for privacy requirements in recording your lectures.
Recording a Lecture
Note: You’ll see participants (students) in a meeting (class) are prohibited from recording; only a host (instructor) is permitted to record. Participants will not be able to record sessions without the host’s permission, do not grant this permission to the students.
- Launch your Zoom session in the Desktop Client application. Zoom sessions in the web browser cannot locally record.
-
See Section C of Guidance on Protecting Privacy and Data During Remote Working and Teaching Using Zoom while COVID-19 Modifications are in Effect for giving notice prior to recording.
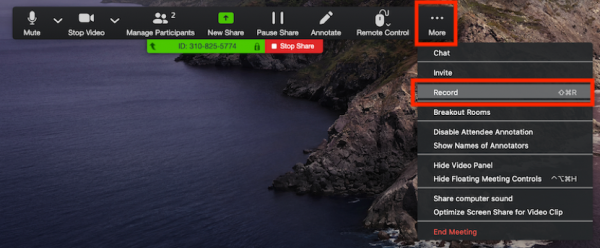
- Hover your mouse or tab to (for tab, you will need "Always Show Meeting Controls" enabled) to the bottom of the Zoom window, a set of tools will appear. Click Record to start recording the session.

- If you are unable to locate the Record button, click on the More… button, a drop-down list with Record will appear.

- If you are unable to locate the Record button, click on the More… button, a drop-down list with Record will appear.
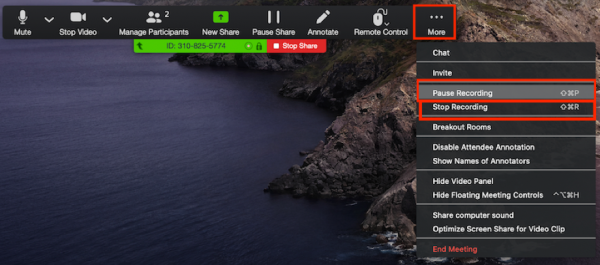
- You can pause or stop recording at any time.
- Pause recording will results in one continuous video.
- Stop recording will result in many videos if you resume recording during the session.

- To end recording, hover your mouse or tab to (for tab, you will need "Always Show Meeting Controls" enabled) to the bottom of the Zoom window and click Stop Recording.
- If you are unable to locate the Stop Recording button, click on the More… button, a drop-down list with Stop Recording will appear.

- If you are unable to locate the Stop Recording button, click on the More… button, a drop-down list with Stop Recording will appear.
- Click End Meeting to render your recording into a mp4 file (NOTE: Do not close your device as this will stop the rendering process and will not have a mp4 file. It can take up to 20 minutes for a one hour lecture).
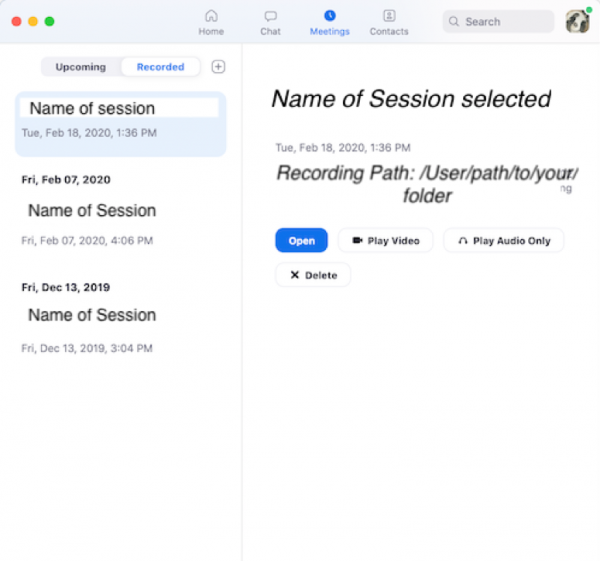
Recordings are stored locally on your computer, typically in your Document folder. Once the meeting is complete, the recording will be converted and saved to your computer. To revisit past recordings, click on the Meetings Tab from the Home Screen and select Recorded.
You will be able to play full meetings with video or just audio, delete recordings, or open the file folder to access the recording file.

Posting Your Lecture to Your CCLE Site
- Click the Turn editing on button in the upper right-hand corner of your site page.
- Click navigate to the section you wish to post your video.
- At the bottom of the section, locate the +Drag and drop file(s) here.

- Drag your video into the +Drag and drop box
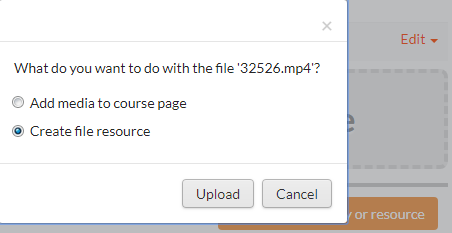
- A Dialog box will appear

- Select Create file resource, then click Upload
- Wait between 10 - 20 minutes for the video to convert, once it is done, will appear as a link on your site

If this method does not work for you, please follow the instructions on how to add a Video Resource.
If you are having a problem with CCLE, please contact your local IT support.
Thanks to Caroline Kong and the CCLE team for their content.

