Appropriate color contrast between a document’s text and background makes the content more accessible to people with different visual impairments. It also makes reading content easier for users without visual impairments.
What’s the problem?
Finding the RGB values or hex codes for a color in order to check color contrast can be tedious.
Why is it a problem?
There are many free resources for checking color contrast, but many of them require inputting RGB numbers or hex codes. Looking for color codes can be a hindrance, which makes it easy to overlook/skip this step.
What to do about it:
WCAG 2.0 guidelines recommend a minimum ratio of 4.5:1 for large text and 3:1 for other text and images. This is a measure of the color contrast ratio, but you will never need to know these numbers or how to calculate them.
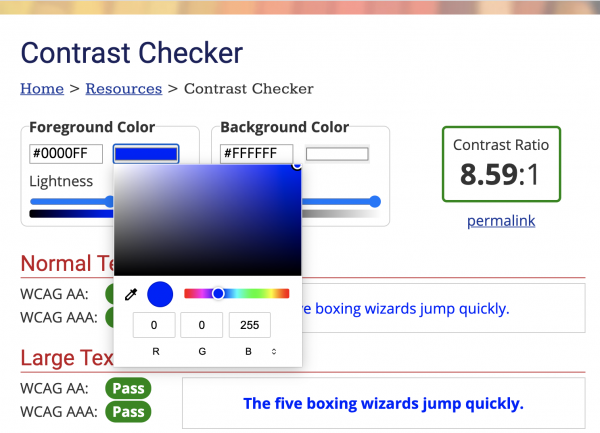
Instead, we use online resources to check color contrast, such as the WebAIM Contrast Checker. This checker requires the user to input hex codes or RGB codes to determine the color.
For inputting hex codes: copy/paste or type the code into the leftmost box in the Foreground color or Background Color box. The default hex code when you open the page will be #0000FF (pure blue) for the foreground, and #FFFFFF (pure white) for the background.
For inputting RGB values: Click the rightmost, color filled box within the Foreground Color or Background Color box. This will open a window in which you can input the RGB values for your desired color.
Checking Colors in Powerpoint
In Powerpoint, here’s how to find and modify color codes:
- Select Format > Theme Colors to get to the theme colors menu.
- Click on each color square to see the hex and RGB codes for each respective color.
- Input those colors into the WebAIM Contrast Checker.
- If the color background combination fails WCAG AA, adjust the lightness slider until the text color passes.
- Copy and paste the adjusted hex code to the theme colors menu in Powerpoint. Press “Save” to adjust the color for all existing and future slides.
Checking Colors on Apple Machines
On Mac products, you can also use the application Digital Color Meter to select colors on a webpage or document using an eyedropper tool. You can then input those color codes into the contrast checker to ensure that they are accessible. The Digital Color Meter is a built in application. To open and use the application:
- Click on the magnifying glass icon in the upper-right corner of your top menu bar, or press "command" and the space bar on your keyboard to open the Spotlight Search bar.
- Search for “Digital Color Meter,” and either press Enter or click the application when it comes up as a search result.
- Hover your mouse over the text or background whose color you are interested in, and the app will show you the RGB values. You will need to remember and manually input those RGB values into the WebAIM contrast checker.
- To view hex codes instead, select View > Display Values > as Hexadecimal. The hex code that you input into the contrast checker will consist of the two values after the “0x” for the three given values.
Example: Given the following color readings in the Digital Color Meter, here’s what to input into the contrast checker, depending on if you prefer RGB values or hex codes. (Note: RGB values are the default output for Digital Color Meter).
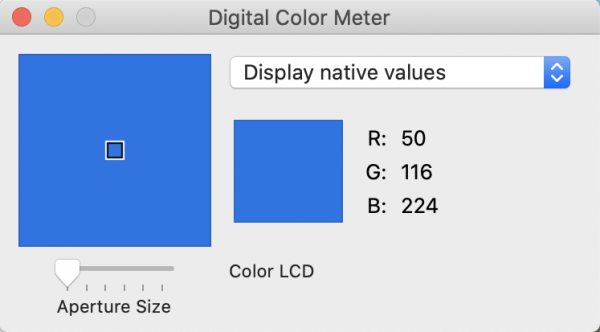
Input 50, 116, and 224 into the R, G, B boxes, respectively.
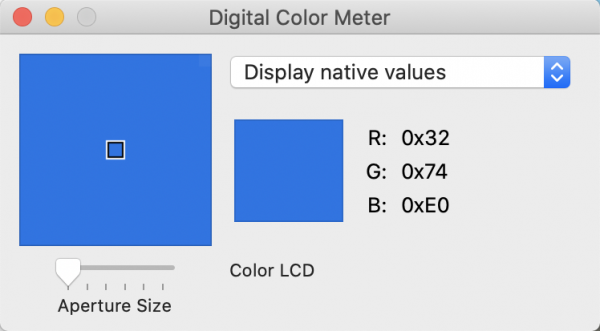
Input 3274E0, from the last two digits of the RGB codes, into the hex code box.
Checking Colors on Windows Machines
On Windows products, Microsoft offers a PowerToy called ColorPicker that works in a similar way.
To get Microsoft PowerToys:
- Download PowerToys from GitHub. Download the latest release (at the top of the page) by opening the Assets menu and installing the EXE file (should be named “PowerToysSetup-0.27.1-x64.exe” or something similar). Run the EXE file.
- Once installed, launch PowerToys Settings from your desktop or Start menu and click “Color Picker” in the sidebar. Make sure that the “Enable Color Picker” switch is in the “On” position.
- The default keyboard shortcut will be Windows+Shift+C to activate the color picker.
To use the ColorPicker:
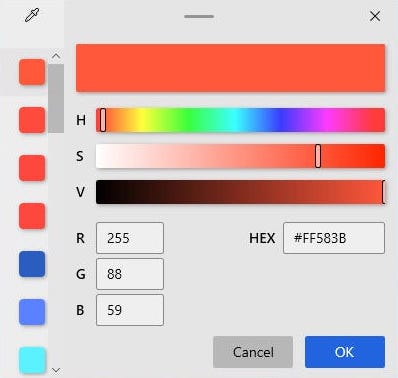
- Once enabled, press Windows+Shift+C. After pressing the shortcut, you’ll see a small pop-up box beside your mouse cursor that shows a square preview of the color you’re pointing to and the hex code for that color.
- Point to anything on the screen to see the color code. For more information on the color, click the left mouse button while hovering over it, and a window will pop up.
- This window displays the hex color code, the RGB value, and the HSL (hue, saturation, lightness) value of the color you just selected.
- To copy one of those values (as a text string) to the clipboard, hover over it and click the “copy” icon that appears.
- To leave Color Picker, press Escape on your keyboard or click the “X” button in the upper-right corner to close the window.